
Powerlifting equipment
This is quite along post about Powerlifting equipment and what I know about it. I tried to get all the equipment I know and use into one spot using pictures, videos and text to make the topic of powerlifting, which I find exciting, more acessible for you.
I would recommend that you skim the post first and dive into the sections which are most relevant to you at first to than come back at a later stage. Each section can be read without reading the other parts of the article. Enjoy and looking forward to your feedback to make this information even better, especially from more experienced lifters than me.

For everyone
These are parts of equipment which apply to everyone, as without them you will not be able to lift at all. I decided to single them out to not have to repeat them in each further section of the article when I go into what I think is equipment that is most useful at this stage.
General observation about powerlifting equipment brands
Powerlifters usually seem to use Inzer belts and suits, SBD wraps and eleiko plates and bars for their competitions while crossfitters seem to more heavily lean into the product range of rogue fitness. Both have options, but if you really want to go powerlifting heavy you know where to go now. I personally own more equipment from rogue so this post might come across as slightly biased towards this brand. This is only due to the fact that I have the most experience with their options.
Barbell
Beginners should from my perspective know how to distinguish between good quality and bad quality barbells and whether they have been maintained in a good way to make a call whether they want to sign up for the gym of choice or not.
If you do some research generally perceived as being good quality barbells are Eleiko and rogue barbells. Generally I found the York brand to be of lesser quality when I used them, but these barbells are quite common in commercial gyms.

A good barbell should have knurling, weigh 20kg and be 28 to 28.5mm in diameter. At each side is should be sleeved, which means that they get thicker at each end the weight can spin freely during the lift. This is achieved either by bushing (lower quality) or bearing (higher quality). For beginners the knurl markings may be of lesser interest, but if you want to powerlift and be serious about it powerlifting knurl marks should be preferred to olympic weightlifting marks on the barbell. Olympic barbell dimension below. Main differences to powerlfiting bars are the positioning of the knurling and stiffness of the bar.

A quick way to check the quality of the equipment in any gym is to touch the knurling on all of the barbells and the screws which hold the sleeves in place. If all of the barbells are not rough to the touch and have the screws loosened you are looking at an establishment which did not switch their barbells since they opened, did not maintain them and have them for a long time. If you check all of the barbells and you get some rough knurlings, some smooth and some with loosened screws you are most likely looking at a gym that got new barbells in at some stage because they needed more, but did not really attend to the equipment. If you find all screws tightened and knurling rough to the touch and the gym did not open in the last year, you are looking at someone who cares about lifting.
If you are a more advanced lifter you might also look for how many different options of barbells are available. There are variations for powerlifters like the mastodon bar, trap bars, buffalo bar and others. Usually these are a good fit for someone who lifts a lot at high loads to vary a bit and put less stress on the body. At least Chris Duffin and Dan Green, both world record holders, recommend the buffalo bar as an alternative to put less stress on yourself when benching.

Another criteria to look at is whip. Whip is usually helpful for weightlifting as the extra momentum you can get out of the barbell when it bends can help to push the weight from the chest overhead in the clean and jerk. In powerlifting,especially on the deadlift, you are usually not relying on whip to lift your way and top powerlifters usually move more weight than weightlifters on their heaviest lifts. Therefore bars with less whip which are stiffer are used in powerlifting competitions.
If you are considering to buy a barbell, think first about your budget and needs. You should be willing to spend north of 200 USD for a general barbell. If you want a good quality special purpose barbell like a stiffer powerlifting one or a weightlifting barbell with bearing. Expec this to put you back somewhere north of 300 USD. The absolute high end products are the Eleiko bars which can cost up to 1.000USD. Then you are using equipment which is also used by olympic athletes, but might not be tailored to powerlifting needs, due to the extra whip that these bars provide.
All in all, for bars, search for good quality bars by brand in your local gyms which have been replaced in time and maintained well while in use (for example ask staff to show you the metal brush they use to tread the barbells, if they don't have one, you have your answer).
If you are an advanced lifter, also take into consideration that there are not just simple barbells around but also variations like safety bars and trap bars. Hereby a good instructional video of rogue to round things up on standard barbells and their difference in their range. Same for Eleiko.
Bench
If you want to powerlift you need a bench for bench pressing. Also here it depends on how serious you want to take the whole game and what you want to do. Here are some tips to decide on what you need and what to look out for in a commercial gym in which you want to powerlift.
Generally there are two different types of benches. The first category is moveable, second one is stationary. For bench pressing stationary benches are usually sturdier and already set up in a way that you can only do little wrong with it.
These ones are preferred to free benches which are placed in a rack for heavy benching. The picture below shows what you ideally want to bench on. Big frame, some weight to itself and drilled into the ground (which has not been done in this example). This will enable you to get in the right position without your back slipping and enbale re-racking the barbell on grinder repetitions without the risk of deconstructiong your general facial area.

If you do not have the luxury to find a gym with a stationary bench like this you have to work with the moveable alternatives.
Here you should really pay attention what you are letting yourself in for. The frame should be sturdy and the bench hard to move. If their is no weight to the bench it is of low quality, will eventually move during the lift or, worst case scenario, even give in under the load and impale you (yes there are some horror stories like that out there).
The width of the bench should enable you to comfortably place both of your shoulder blades onto the bench and dig them in there. There some narrow benches out there which are good for bodybuilders (and usually cheaper) which I would not recommend for powerlifting. In case you have an imbalance in oyur bench press between your left and right hemisphere and you place yourself on a narrow bench, there is more risk of slipping of and losing control.
Last thing to mention on benches is grip. Also pretty easy to test by running your hand over the leather / surface of the bench before getting to benching. The harder it is to run your hand from one end to the other, the better. If the bench feels like a sheet of ice, be careful, as you will slip. Maybe compensate by wearing a shirt with some grip to it. An A7 Bar grip shirt might fix that. However having to fix a poor bench with a shirt is the very definition of having it arseways. I have not used these shirts before, but saw interesting reviews and would see an interesting apllication in squats.
Summarising for benches they should be heavy, wide, stationary and have good grip. If they are not stationary same apllies and simply lifting the bench up will already tell you whether you really want put 150kg+ on the barbell and then lay down on it.
Squat Rack
Here again you have two alternatives. The first one are proper squat racks with safety pins. The second is a simple squat stance.
A squat rack is a frame of steel in which you step to squat for additional safety. The idea is to use J Cups adjustable to your height. You can put them the holes which have been drilled into the frame. Put the barbell on and two steel safety pins at the bottom of the squat, where you can set the barbell down and exit safely unerneath, if you fail a repetition. As mentioned for barbells, generally the heavier the squat rack the better the quality and its lifetime. Another diffenrentiator between lower quality and higher quality models is how the holes have been placed in the frame. Check how smooth the holes are and the more sophisticated alternatives have smaller increments between the holes in the lower part of the frame to make them more useable for placing safety pins and adjusting the setup for bench presses.

![]()
In my personal opinion as long as the frame is sturdy, it can be drilled into the gorund and allows for safety pins a squat rack does its job. Anything above and beyond that is nice to have.
If I was to purchase a serious home gym, the squat rack would be my first adress to save a couple of bucks against a better barbell, plates and proper bench. There are even some good tutorials out there to build a squat rack yourself. Only recommended if you are DIY savvy, which I am not. Still do not squat (especially as a beginner) without having the option of safety pins.
The second option are squat stances, which are a good option if you are limited for space. Keep in mind that with squat stances you do not have the possibility of safety pins. So practice to exit a lift by dropping the weight away from the stance. For front squat & jerks this would be deloading to the front having unracked the weight moving forward. For back squats this means deloading to the back while having unracked the weight moving backwards (ideally three steps see my post on on creasing your squat for details).
From my personal experience due to being less safe and the need to have better technique and control of the lift I recommend squat stances for experienced lifters and people who work more dynamically and feel limited by the squat rack setup. This video from California strength will give you some perspective on why I think that squat stances are more suitable for beast athletes:
For beginners
Moving on from the equipment which is needed for everyone this next chapter will provide tips for individuals who just start out and don't know how to prioritise what to get yet. Of course you can get everything there is, but this might not be wise in respect of your wallet and also as you do not know as a beginner whether you will be in for the long haul or just say "F+++ THIS, i quit" when the first weight hits your neck or bench press kisses your forehead (it will happen).
Gym membership
I have covered this topic in other posts before, but I am a big fan of paying a bit more for your membership and find a gym that is serious about lifting and results if your aim is to get strong, rather than signing up for a commercial gym.
Your gym should ideally by within walking distance of your home, not your job. Tried both and home always won over job in terms of actually making it there early in the mornings. The whole routine of bringing your gym gear to work, having to change and shower at the gym etc. usually gets annoying after a month.
The gym itself should have no problem with noise if you are going to powerlift. Gym owners who are afraid of noise and make their most money with middle aged women and rehabilitation (which most commercial gyms do) tolerate bodybuilders, but usually not powerlifters. Powerlifting involves clanging, banging and grunting. Sign up for a gym which embraces this.
When you first walk in, don't be intimidated. I came to know that strong people are usually very nice, they just have a very brutal bullshit radar. So don't expect the warmest of welcomes as you have to pass that filter first. Show up, do your research online, be regular and others will take notice. Once they see you are working your ass off, they will acknowledge that and you might even find actual (rather than superficial) friends in your gym of choice. This by the way goes independently from whether you are a woman, skinny or lifting less than than the regulars. Hard work, putting away your stuff, generally get on with your stuff without being annoying and show progress will get you to the point where you also will be part of the gym inventory. Maybe give a warm smile to a newbie, before putting up the bullshit radar though, once you arrived ;).
Paying a little extra usually also means that students and families are not blocking your equipment prolonging each of your workouts for at least another half an hour. Money well spent from my perspective.
Lifting plan
If you are signing up for a commercial gym in lack of a performance gym being around, be prepared to find a lifting program yourself. Powerliftingtowin.com is a great source for that purpose. Spend the weekend needed to pick a program.
In the commercial gyms I have been in personal trainers seem to have a negative bias against powerlifting due to health risks. Most of them also have not done any powerlifting themselves and are more apt in areas like spinning, TRX and other classes which are more appealing to the masses. So don't expect anything of quality that goes beyond the first instruction to cover the insurance policy.
I've done Stronglifts 5x5 and Jim Wendler 531 if you are intrested in more details on programs and which one will fit your needs. The main point is to have a program, if you follow them, they all make you stronger, which for a beginner should be the main concern (yes you pros out there, of course there is more to this, but let's stick with that for now.)
ShortsLast but not least for beginners a proper pair of shorts goes a long way in the gym, even before lifting shoes and a belt. Because it can get quite embarassing if your trousers rip during a squat session. If you squat deep, like you should, that is not an unlikely scenario. I personally found the fight shorts from rogue to be pretty nice for that purpose. You can also use long swimming shorts for this purpose.
For beginners to intermediates
A gym membership and knowing how to evaluate the equipment in the gym that you are signing up to should bring you throgh the first three months of the program of your choice, even without investing in further stuff. After this time and if you are still motivated and seeing progress, it is not unlikely that you will stick with lifting for longer and look into your first serious purchases for powerlifting.
Belt
Once you start squatting more than your own bodyweight it is time to think about a proper belt. Again here are several options to be considered which I will go through.
- Belts available in your local gym
- The rogue Ohio Belt & powerlifting belt
- The Inzer Belt with clip
The first option are the belts which are available at your local gym which can be used by everyone. These are usually of lower quality, because they came for free with some bigger delivery of protein and/or equipment that the gym purchased in the past. Good to keep you warm during a lift, but generally not sufficient for the heavy lifts and support you need during a one repetition maximum attempt on a squat or deadlift. If you see a a lifting belt made with velcro and which is not cut from a cow use it until you can get some thing better.
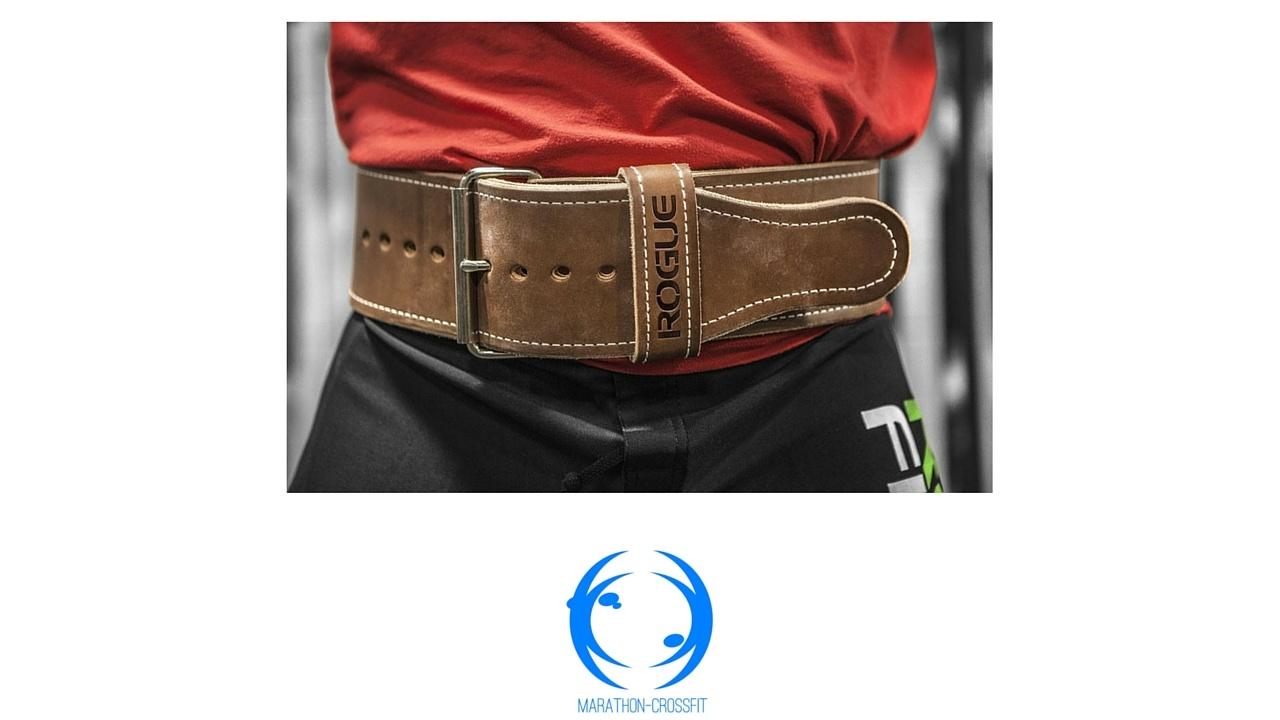
I have personally been using the rogue ohio belt for more than a year now. It is still in good shape and supports me on my highest loads. Easy to get in and out of and was able to take a good beating in my gym bag together with other stuff. I am very happy with that purchase and I think it is a very solid all around belt for people who do not want to only powerlift, but also do olympic weightlifting with their belt. Another option is the Rogue powerlifting belt, which is basically the same but with thicker leather than the Ohio belt. It has to be said, that this belt is very popular amongst crossfitters, but rarely seen with elite powerlifters. The next option might be your choice, if you want to focus on powerlifting mainly.

The Inzer lever belt is what I see most commonly see at powerlifting competitions when I skim and scan youtube. The immediate advantage of this belt is the clip system which makes it very easy to get in and out of the belt while keeping it tight on your body. If you are the only one using the belt, which would be the case if it was in your gym bag, it is ideally fit to your need. If more than one person were to use it the setup can get very cumbersome as you need a screwdriver to change where the clip sits on the belt.
Final words on belts are that you definetly need one once you advance further than novice stage in my opinion to learn how to lift with one and if you want to become a serious powerlifter, there is no way around you having a belt. If you were a crossfitter or someone who wants to dabble with all different ways of lifting, maybe the rogue ohio belt is a good choice for you. If you wanted to focus on powerlifting mainly, go for a lever belt. (i do not own an Inzer belt though, so maybe check other reviews first to be really on the safe side).
Shoes
For powerlifting shoes you also have sevral options. For the sake of this article I will go from least to most specific to powerlifting to hopefully avoid confusion. From there you can pick what is most suitable to your training style. In total I see following options of shoes:
- Normal / Everyday shoe
- Running shoe
- Chucks
- Crossfit shoes
- Weightlifting shoe
- Powerlifting shoe
- Powerlifting slippers
Your normal shoes are quickly eliminated as an option, because most gyms, if not all, do not allow your everyday shoes to be worn.
The average running shoe or joggers which you will most likely have at home already are ok to begin with, but not great. I would be hard pressed to tell you that you have to have chucks from day one when you are still starting to figure out whether this whole lifting thing is really for you. If you do not want to invest into a new pair maybe even consider doing the deadlift and squat barefoot / on socks (which more experienced lifters do anyway for the deadlft). It is better than doing them with runners, as these usually have cushioning and therefore provide instability during the lift.

Chucks are a great alternative for beginners as they provide you with the solid sole which you need while still being able to use them even after you quit lifting, if you decided that this whole thing is not for you. Mehdi at Stronglifts 5x5 recommends them for lifters on a tight budget. I have personally not lifted in chucks yet, but i can see that this can totally work. The only disadvantage to weightlifting shoes is that they have no raised heel. For the squat that is helpful, for the deadlift debateable, as you want your feet to be as close to the ground as possible to minimize the distance the bar has to travel.
Next category are crossfit shoes. These are the newest edition to the options a powerlifter can choose from due to the recent crossfit craze. If Nike and Reebok decide to dedicate an entire range of shoes to this sport, i personally think you should take it serious. Powerlifting did not pull this one off to this day...
I have linked a review of multiple crossfit shoes earlier as I do not own a pair and therefore take my comments with a grain of salt. How these shoes seem to be designed is that they give you some cushioning to be able to run and some stiffness in the sole to be able to perform proper deadlifts and squats.
This is fine and nice when you want to do a workout of the day in which you usually do deadlifts, squats, snatches and clean and jerks for 5+ repetitions to then move to the next station in the circuit. For this apllication you do not necessarily need the maximum amount of stiffness in the shoe as you are operating far from your one repetition maximum. So to finish on crossfit shoes, they are crossfit shoes, but not designed for one repetition maximum attempts on the deadlift and squat. Just keep that in mind when picking your pair of choice. Therefore I would classify these shoes less specific to powerlifting than chucks.
From what I see what is out there in terms of powerlifting and weightlifting shoes there are three main pairs to discuss.
I do own both of the Adidas shoes and have reviewed them on my blog in earlier posts. I have used the Adidas powerlift for a year before treating myself to a Adidas Adipower in October 2015 in Black Friday Sales. In 2017 I got a pair of romaleos.
The Adidas Powerlift are a good option as they come at an ok price below 100€ / USD and are specific to powerlifting. They have a less raised heel than the Adipower and are not as snug around the ankle as the adipower. The Adidas Adipower provide more ankle stability and more tilt for your feet as your heel will be slightly higher. Here you see the differences between the shoes as the raised heel on the squat is helpful while adding some unneeded inches on the deadlift where the Adidas powerlift wins. All in all if I had to do this all over I would directly go for the Adipower, which admittedly, are quite more expensive than the powerlifts.
For more one repetition maximum attempts I usually take my shoes off, so it does not matter. The better feeling and stability I get on the squat by wearing the adipowers outweighs the disadvantage of adding maybe one inch more to the deadlift when you keep the shoes on and do them for repetition. To be honest these differences are really minor and you can become a very good lifter with both of these shoes. If your shoes are a problem, you have an attitude, not an apparel challenge to face.
Last but not least are the Nike Romaleos. I do own them and from what I have seen and read about them from several other lifters they basically do the same as the adipowers at a comparable price. So here it really comes down to personal üpreference in design and for brand as the budget and functionality stays the same give or take 10€ / USD.

To make the shoe line up complete we have the most specific shoe to powerlifting: powerlifting slippers. They look a bit like ballerina shoes for 100kg+ monsters and to be honest, that is kind of what they are. These slippers have been minimised and designed to keep you as close to the ground as possible while providing stability to push against and create an even surface for the heaviest deadlifts you do.
Your heels are flat in these shoes. I do own a pair myself and they come highly recommended from Brandon Campbell with a deadlift north of 250kg and I have seen other elite deadlifters using them. This is an item who can be acquired by intermediates with big ambitions, but is more suited to competing powerlifters who really want to leave nothing to chance and fight for every single gram on each deadlift to be the best on the platform. They also come surprisingly cheap compared to the rest of the portfolio.
For Intermediates
Once you start moving more weight than most if not everybody in your local commercial gym, you have reached intermediate powerlifting level. If you are male and squat more than 150kg, deadlift more than 170kg and bench press more than 120kg I think in most cases you are there give or take 10 - 20 kg depending on your bodyweight.
As you are now most likely moving more weight in a single lift than you weigh the phrase "Protect yourself before you wreck yourself" applies. The weakest points of your system are your joints where you have the least amount of muscle mass and the most ligaments making movement possible and injury most likely, if it occurs. For intermediate lifters I personally think the time has come to think seriously about protecting these areas and here is an overview of the available equipment which does just that.
Knee sleevesI personally own a pair of rehband knee sleeves and I can only recommend that you get some type of knee sleeve for your gym bag. Especilly for the squat in training knee sleeves are an easy option to handle and to carry as they are lightweight and easy tp put on. I like to use them when I squat more than 80% of my repetition maximum in work sets. For warm up sets I usually wear them on my thighs to pull them up later. Otherwise you have to take off your shoes during your session. They come in various calours and sizes. The thicker the sturdier they are. The Rehbands are multipurpose and not specific to powerliftng only. If you want something that is more tight your other options are the SBD knee sleeves or the Mark Bell knee sleeves.

The SBD knee sleeves have more of a tube form to them and are a tighter fit. Generally this is better for squatting, as you do not run in the SBD's. The Rehband's allow for more flexibility for running and generally allow you to move a bit more free than the SBD's. This higher flexibility comes at the cost of being less stiff, which you actually want for powerlifting. You will find rehband generally more commonly used amongst professional crossfitters while SBD is used more commonly amongst profressional powerlifters.

While you will find mainly reviews on the two afore mentioned sleeves the last one is a relatively new edition. Mark Bell, inventor of the sling shot, has recently added the STRONG knee sleeve to his product range. These are more similar to the SBD than the Rehband's as far as I can tell and should be more suitable for powerlifters.
Knee Sleeves will roughly put you back somehwere between 40 - 80 €/USD depending on what brand, size, colour and special make you get. After a shoe upgrade from runners and investment in a lifting belt I personally thinnk this is the next go to for someone who starts squatting north of 1.25x his / her bodyweight for repetitions.
Wrist wrap
Wrist wraps are a wide field and you will find all kinds of variations for pull ups, to protect your hands and stabilising your wrist. For powerlifting you want something sturdy to protect your wrists during a heavy bench press. Something to keep your hands in line with your wrists to avoid loss of power and minimise the risk of injury in the wrist through sudden movement. I personally own the Gansta wraps from Mark Bell and could not be happier with them. Easy to use, good quality product with minor excemptions. If you are serious about benching and overhead presses this will come as a good addition to you to protect your wrists besides your knees.
Straps CollarsIf your local gym does not provide for collars to keep plates from slipping of the barbell I think that intermediate level is the latest stage to get this one sorted out. At this stage you will most likely move two to three big plates on each side of the barbell. You do not want this to come flying at you or others somewhere mid way through the lift.
There are many differenmt types of collars yet again but if I was to buy some i would probably go for plastic collars in the range of 40 bucks which you can clip onto the barbell. Again, most gyms will have this, but if not get your own pair at this stage.
For intermediates to advanced
By this time you will own or the gym of your choice will provide for everything you need to become a good lifter and compete. The next items I am going to talk about are for the most advanced lifters which in my personal view lift somewhere in the 2x bodyweight area. At this stage you are most likely the strongest guy in your local gym, you have switched to a special trainer / switched gym just for the sake of powerlifting and you are serious about things.
Here I am also treading a bit on unknown territory as I am personally not there yet. The next items are therefore for the interested only. If you are a very experienced lifter please also consult other blog's of elite lifters like Chris Duffin, which will have more relevant & specific information for your needs and more experience on your level.
Bands
Chains
Chains do the same as bands do for a powerlifter in general, but slightly different in practice. If you are just beginning with manipulating the load curve of a lift yu will find chains to be easier on you than bands. Also on very heavy lifts chains seem to be the better option, as you do not want to strap 300kg+ to your back with bands in case of yu failing the lift. That could turn out rather ugly. When I use chains I usually do 40 . 60% of my one rep max and than load additional chains to it until i get just above my actual one repetition maximum at the highest point of the lift. This usually pans out for me at roughly 40kg in chains. Chains have the advantage over bands that they are more easy on your joints, as they do not keep under tensions during the entire lift. The backdraw of chains compared to bands is, that the resistance unfolds not consistently and exponentially during the lift, but linear per chain link leaving the ground. That is not ideal for speed work. In addition they are also bloody loud. You can not really have a conversion when a guy next to you bangs out some chained reps. This is why chains are usually only allowed in gyms which are serious about strength.
Chalk
Another item which a serious gym will provide to you for free and you otherwise will have to get yourself. Most likely chalk will not be allowed in your commercial gym and is a good indicator that you do not want to stick with this establishment anymore at this stage of your progression and have to search for something else. Chalk comes in liquid and normal form. The better, less messier option to keep in your gym bag is the liquid version. However most "gym bag" videos I have seen so far show some half used age old liquid chalk flying about which means that the guys do not really use it. So maybe save your money and stick with the chalk provided by your gym.
Technology
While runners use their garmin watches fo quite a long time now and activity trackers seem to be the newest craze in fitness, Ihave not seen many proper models for weightlifting yet which are affordable and are easy to use. The two options I found which are in the 200 - 300 USD/€ area are the push band and the beast sensor.

Chris Duffin uses the push band in his remote training courses to track the activities of the athletes and be abe to coach them remotel while having access to all of their performances and sessions which they log online. There other pieces of software out there which do the same, but very little who really monitor each repetition itself in terms of bar speed, load and number of repetitions. This seemingly takes the guesswork out of how many repetitions you have to do to achieve a certain lifting goal like building muscle, explosiveness or power. I personally can sse that work to keep track and also make informed choices on your lifting program and how well it is stacking up for you personally. Again a considerable invest to make. The push band seems to be in front for powerlifters as it has options like squats with chains and also seems to have less setup problems with the three main lifts.

The beast sensors is fairly similar in terms what it claims to achieve, but seems to have been more geared towards body movements to accomodate for crossfit like circuit training. Puh seems to have problems based on what I read (this is me writing this in Feb 2016, so there might have been bug fixes by the time you read this. Please check if you go deeper into the matter). While push is an american product beast ships from the EU for those amongst you who might have animosities due to nationality. (Rogue for example makes quite a song and dance about their stuff being american made)
I did not test these products myself and only read up about them. For me this makes sense, but would have to be tested in real life and how well these instruments actually measure and which impact it has on your training. So far my experiences with Garmin watches for preparing for a marathon was very positive, so my tendency would be that this does help your progression, if you can afford it.
For advanced to expert
These items are quite pricey and usually not used in regular training, unless you are a competing powerlifter. For everyone new to the sport this is only mapping out what could await you at the end of your journey. For intermediates who found this article it is about what options there to bring their game to the next level.
Squat Suit

Squat suits are being used to press your body in form like a corset during a squat. This usually helps to provide more stability and some extra pounds on your lift through pressurising your entirebody. These are usually quite cumbersome to get into and therefore you need a trainer or some other helper to get in and out. As oyu can see this is not really an average joe every day scenario. Elite powerlifters usually only wear suits for mock meets in their training sessions, on special training days and on competition day. Therefore every category of lifter I mentioned before will most likely not use them at all.
Also depending on the rules of the federation you want to compete in a suit might not be allowed or only a certain type of suit. Here you it gets very specific for individuals who are all about competing. Also you look a bit like a big toddler in them, so only wear on special occasions ;).
Bench Press Shirt

I introduce to you the wonderbra for man boobs. A bench press shirt basically does the same as a squat suit for the squat. Only difference is that lay out of the cut and where it applies pressure is optimised for benching rather than squatting. As oyu can see from the two pictures most of the upper body is free with a squat suit whereas a bench press shirt covers these areas so that you look like the male version of Pamela Anderson in Baywatch. The hoff should have worn this.
Monolift

Mono = Single and by now you should now what lift means. Again this is an item to look out for in a gym if you get really serious about lifting in the 2x + bodyweight area. Here you want to avoid for best performance that you have to walk the weight out of the rack which a monolift station takes care of. The lifter gets beneath the bar and unracks it. Following the structure which the bar rested upon is being swivelled out of the way so that the lifter can perform the squat without having to take steps. If you want to prepare for a powerlifting meet and practise the setup, a machine like this is necessary as it is usually used at powerlifting meets. Following video gives you a good impression of what a monolift is meant for:
For experts / competition
These two items should in my opinion really only be sonsidered if you want to compete. Otherwise no use to have this equipment lying around with getting no use out of it.
Knee wraps

Knee wraps are one nodge up from knee sleeves. They have to be hand warapped around the knee and usually fastened by using a prong or help from someone else if really done properly. This is the extremist form of support you can have for your knee joints on the deadlift and squat, is not allowed in all competitions and can only be used with help. Therefore this is competition equipment for powerlifters which they will most likely use only on meets or at the end of a training cycle as knee sleeves are simply a more convenient option.
Lights

Last item on the list are lights, timers and other equipment which you need to run a powerlifting competition. The lights are used to see whether the three judges who observe a lift from different angles are judging it to be up to standard for the rules which are apllied for the competition. This is mainly on how deep you have to squat and whether the bar path for the deadlift and becnh press has been an upward motion all through the lift with no downward motion. Rules might differ per lifting association / federation so please check before you can compete to not get red lighted on competition day only due to not understanding the commands and what is expected from you in the performance of the lift.
Further reading
- How to warm up for powerlifting
- How to plan your first powerlifting meet
- How your body gets stronger for powerlifting
- Powerlfting workouts for beginners
- Stronglifts for powerlifting
- The essential lessons for conditioning for powerlifting
- Wrist wraps for powerlifting review
-
-